Having a blog is truly amazing, because you can freely share your thoughts, experiences, and knowledge with entire world, and earn a decent income through your blog.
I have been earning thousands of dollars from my blogging website for the past few years, and you can too. You can see my one year earnings report here.
In this article, I will explain to you step-by-step, with screenshots, how to create a free blog on blogger (also known as BlogSpot) in 2026.

The best part is that you can start your blog for free with the help of Google, which provides a blogging platform called BlogSpot, allowing you to create a free blog.
Typically, a Blogger blog site has a URL like yourname.blogspot.com, but you can also add your own custom domain, such as example.com, if you wish.
Here, we will learn all the basics, such as creating a blog on Blogspot, configuring settings, writing your first post, and adding a custom domain.
- Is BlogSpot the Right Platform for You?
- How to Create a Free Blog on Blogger Platform – Step by Step Guide for 2026
- What should I do After Creating a Blog on Blogspot?
- Final Words,
Is BlogSpot the Right Platform for You?
If you are a new blogger, have no enough knowledge of blogging, and want to start without spending any money, then Blogger is the best platform for you.
There are no domain nad hosting costs or maintenance worries. Simply log in with your Gmail account, you can create a blog easily, and start writing.
However, it’s also important to mention that Google’s free Blogging platform has some limitations, which we will discuss below.
Therefore, if your budget allows, I highly recommend you to create your blog on WordPress platform, for which you will need to pay for hosting.
We have already shared this information; you can find it here.
In this article, we will only talk about creating a free blog, so let’s get started.
How to Create a Free Blog on Blogger Platform – Step by Step Guide for 2026
Before you start creating your blog on BlogSpot, make sure you have a Google account ready, as you’ll need it to sign in to Blogger.com.
Once you’ve logged in, simply follow the steps below carefully, and your free blog will be up and running in the next 2-5 minutes.
Step 1: Sign Up/Sign In Google Account
First, you need to open the Blogger.com website in your web browser. Once the site loads, you will see the “Create your blog” button on the homepage.
- Click on the “Create Your Blog” button.

This is where your blogging journey officially begins.
Now, let’s look at the next step.
Step 2: Choose an Google Account
Now you will need a Google account to log in or sign up on blogger.com, you can choose one of your existing Google accounts.
- Select a Google Account and follow second step.

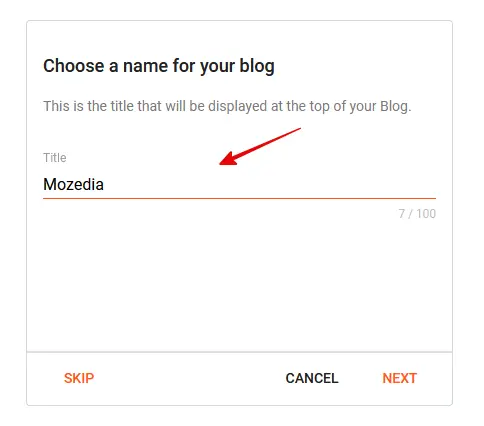
Step 3: Choose a Brand Name
After signing up, you now need to choose brand Name for your blog. This is the name by which your blog will be identified on the internet.
For example, if you want to create a blog in the tech niche, you can choose a name related to technology. Just like I chose the name Mozedia for my brand.
- Choose your blog name and click the Next button.
If you’re having trouble making a decision, don’t worry, it happens to everyone at first. It happened to me too, which is why I’ve shared detailed guide to solve this problem.
Please read this article.
Step 4: Set a Domain Name
After choosing a name for your blog, you now need to set a domain name (URL) for it. This is the name by which your blog will be accessed in a web browser.
Choose a domain name that is related to your blog’s niche or your favorite topic, so that users can easily understand what your blog is about.
- Set your blog name and click on the Next button.

When you choose a free domain on Blogger platform, your blog’s URL will end with blogspot.com, such as mozedia.blogspot.com.
If you wish, you can purchase a professional domain name like example.com and connect it to your blogspot blog, which I will explain in more detail below.
Step 5: Confirm Your Display Name
Now you need to confirm the name of your blog that will be visible to your readers, just like our site’s name is Mozedia – Blogging Tutorials, SEO Guide and Tips.
If you want, you can also add a catchy tagline to your blog display name, just like we’ve shown in this screenshot below.
Once you’ve decided on the name and tagline, finally click the Finish button, and that’s it, your blog is set up.
- Confirm your display name and click the Finish button.

Your blog is now live online and the world can see it. That was very easy, wasn’t it?
Congratulations, you have successfully created your free blog on Google’s blogspot platform.
After that, you simply need to configure some essential settings, create some necessary pages like About, Contact, and start working on your first blog post.
Let’s move on the next step.
Step 6: Write Your First Post
Once your blog is created, you can start writing. So, let me give you some basic information about writing your first blog post.
- To do this, go to the menu on the left side and click “+ New Post“
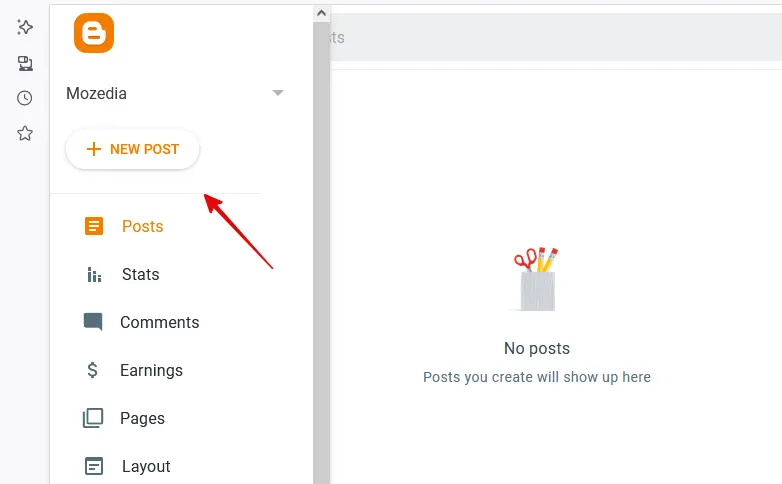
That’s it! The post editor will now open, and you can start writing your content.
To make your content professional, use blogger’s formatting options shown in the screenshot to attractive, and engaging your audience.
- Headings: To clearly define the main topics
- Subheadings: To break down long content into smaller sections
- Bold Text: To highlight important words or points
- Bullet Points: To present information clearly and concisely
- Numbered Lists: To show steps or sequential information
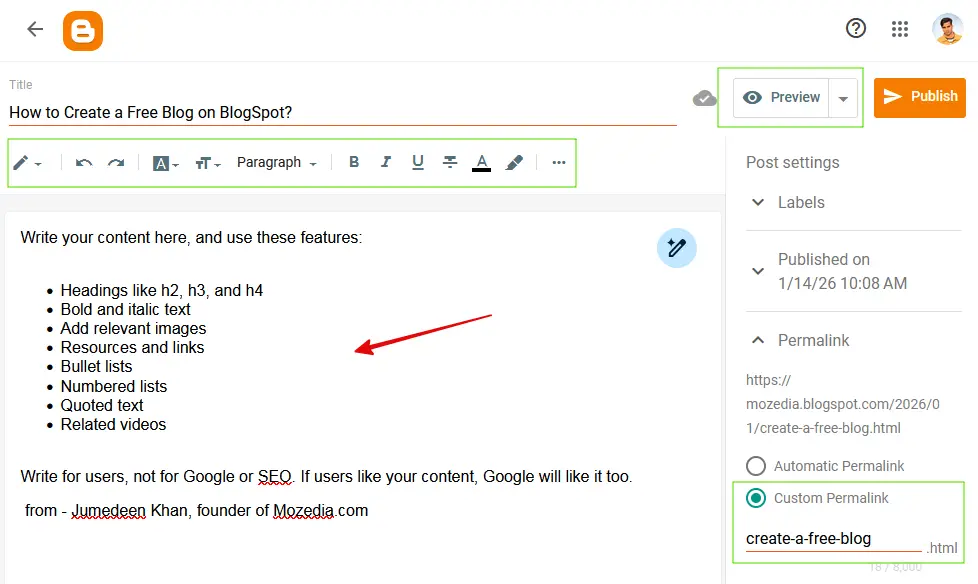
Using these effectively will not only make your blog look professional but also encourage readers to keep reading your posts.
You can also include high-quality images and videos in your posts. This can help you attract more visitors to your blog posts.
Remember, your journey has begun; now hard work and consistency will make you a successful blogger.
Let’s move on to the next steps and transform your blog into a fantastic website!
What should I do After Creating a Blog on Blogspot?
Creating a blog and writing posts isn’t enough; now you need to configure some essential settings for your blog. Let’s learn about those as well.
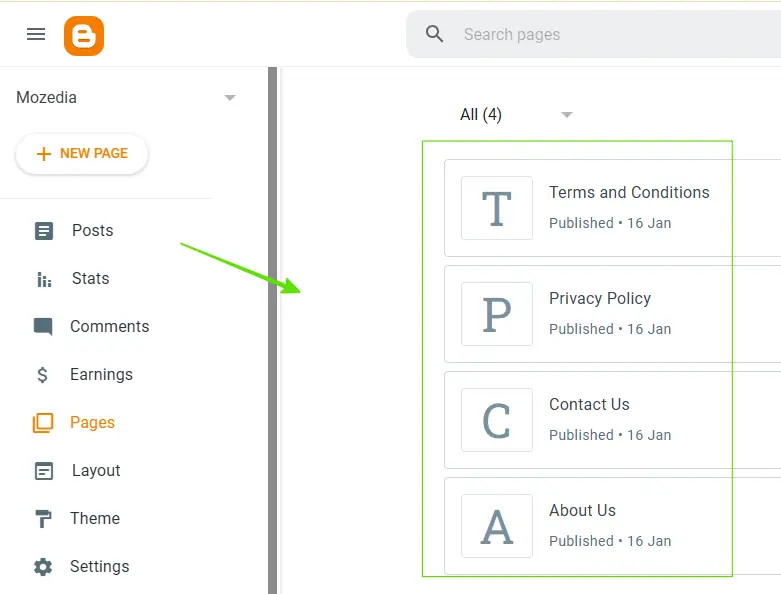
1. Create Necessary Pages
Now you should create some essential pages for your blog, like About Us, Contact Us, Privacy Policy, Disclaimer, and Terms & Conditions.
These pages help readers learn about you, contact you, and understand how your blog operates.
You can write a page to Blogger dashboard >> Pages >> New Page.
2. Choose a Perfect Theme
When you create a blog on Blogspot, Blogspot provides you with several free themes. From these, you need to choose a template/theme that is:
- Clean and visually appealing
- Fast loading
- Mobile-friendly
- Easy to customize
- Allows you to easily change the menu, logo, colors, and fonts
- SEO-friendly

If you don’t like your simple blogger template then you can find your favorite theme from the internet, download it and upload it on your blog.
3. Set Custom Domain Name
When you create a blog on Blogspot, your website address initially looks something like this: yourblog.blogspot.com.
This is Blogger’s free subdomain. It works, but it doesn’t look very professional.
Therefore, most bloggers buy their own custom domain name, just like we chose mozedia.com for this website, you can choose one too:
- yourblog.com
- yourname.in
This is called a Custom Domain.
Why do you need a Custom Domain?
- It gives a professional look; a .com or .in site looks more trustworthy.
- It strengthens your branding; people remember your blog easily.
- It benefits Google SEO; makes your blog appear more serious and credible.
- AdSense approval is easier; Google gives more preference to custom domains.
- It reduces dependency on Blogspot, you can migrate to WordPress in the future.
How to Set It Up?
First, you need to buy a custom domain (from GoDaddy, Namecheap, Hostinger, Google Domains, etc.)
- Open your Blogger Dashboard.
- Go to Settings and click on the Custom Domain option.
- Add your custom domain and verify the DNS settings.
- Also enable HTTPS for security and SEO.

In a few minutes, your blogspot.com URL will be replaced with your new .com/.in domain.
If you need complete guide to setup custom domain blogger blog, then read, how to add custom domain URL in blogger blog.
4. Enable Essential SEO Settings
When you create a new blog, Google automatically tries to understand your site, but if you turn on certain settings, Google receives clearer and more direct instructions about your blog.
These settings help your blog get indexed faster and achieve a better ranking.
These settings specifically include:
- Enable custom robots.txt
- Set custom robots header tags
- Turn on Search Description
- Always write a post search description
- Enable HTTPS redirect
All of these help Google properly crawl and rank your blog.
5. Submit Your Blog to Search Console
After creating a new blog, adding it to Search Console is like telling Google, “My site is here, please check it out and index it.”
Steps in short:
- Open Google Search Console
- Add your blog’s URL and verify it
- Submit your sitemap (/sitemap.xml)
After doing this, Google will start crawling your blog’s pages and displaying them in search results.
6. Connect Google Analytics
After creating your blog, it’s essential to know how your content is performing and which posts people are viewing or reading and how often.
Google Analytics is a tool that shows you real data about your blog, such as how many people are visiting, where they are coming from, which posts are performing well, and where readers are leaving your site.
Setting it up is very easy:
- Create a Google Analytics account
- Copy the Tracking ID
- Paste it into your Blogger settings
That’s it! Your blog will start tracking data.
7. Publish Content Regularly
Creating and setting up a blog is just the beginning. The most important task now is to publish new posts regularly.
Google promotes blogs that consistently provide fresh and useful content.
Therefore, try to:
- Write at least 2–3 new posts per week
- Provide content that helps your readers
- Write in your own words, no copying and pasting
- Keep the information easy to understand and clear for your readers
Ultimately, the true power of a blog lies in its content. The better and more consistently you write, the faster your blog will grow.
8. Promote Your Blog
Simply creating a blog isn’t enough. If people can’t find your articles, how will they read them?
Therefore, sharing your blog in the right places is crucial. You can start promoting your blog on these platforms:
- Facebook Groups and Pages
- WhatsApp Status or Broadcast List
- Your Instagram Page or Threads account
- Telegram Group/Channel
- By answering questions on Reddit and Quora
- By creating engaging Pins on Pinterest
Simple rule: The more people you reach, the faster your blog will grow.
9. Keep Learning & Improving
Blogging isn’t something you can set up once and forget about. The internet is constantly changing, so a blogger must also keep learning.
You should continuously do the following:
- Learn SEO and apply it to your blog
- Update old posts to keep them fresh and relevant
- Try new things and don’t be afraid to experiment
- Analyze your analytics data to understand what your readers like
This continuous learning and improvement is what sets you apart from other blogs. Those who learn and adapt are the ones who succeed.
And yes, if you want to learn everything about blogging, SEO, and technology, stay connected with Mozedia.com.
Just as you learned how to create a blog on Blogspot in this article, you’ll find even more blogging information on Mozedia.
10. Apply for Google AdSense
Once you have published approximately 10–20 good, useful, and original articles on your blog, you can start the process of earning money from your blog.
Blogger is a Google service, and Google provides an official advertising program called Google AdSense.
Read the complete step-by-step guide on how to apply for AdSense here:
After your AdSense account is approved, Google displays ads on your blog, visitors click on those ads, and you earn money.
This means you can earn money even with a free Blogger blog, just create some quality content and then apply for Google AdSense.
There are some more things that I will teach you in the future.
Final Words,
As you saw above, creating a free blog on Blogspot is very easy, but making it successful depends on consistently following the right steps.
Creating essential pages, choosing a good theme, configuring SEO settings, writing regular posts, and promoting on social media, all of these contribute to your blog’s growth.
Furthermore, continuous learning, improving old posts, and starting to monetize with AdSense at the right time are what transform a new blogger into a professional one.
Just maintain hard work and consistency, and your Blogspot blog can also achieve great success.
You can also read these articles too.
If you may like this article, please share it on social media with your friends.

Just what I needed! I set up my Blogspot blog in minutes thanks to your clear guide. Appreciate the easy steps!
Thanks, Anjali! I’m really glad the guide helped you get started so quickly. Wishing you lots of success with your new blog! 😊