Bluehost is one of the world’s most reliable and top-rated web hosting companies. If you want to start your first blog, Bluehost can be the easiest and most affordable option for you.
In this article, I will provide you with a step-by-step guide on how to purchase web hosting with a free domain from Bluehost and start your blog in just a few minutes.
WordPress officially recommends Bluehost as its preferred hosting provider because it is a very old and reliable hosting company that offers WordPress hosting since 2005.
This is one of the earliest WordPress hosting providers, and it remains an affordable wordpress hosting provider even with the emergence of many competitors today.
The biggest advantage of Bluehost is that it offers expert 24/7 support, a free SSL certificate, free CDN & security, and a free domain with web hosting.
So, let’s learn how to buy web hosting with a free domain name from Bluehost for your WordPress blog? A step-by-step guide for 2026 (with screenshots).
Before we begin, here are some things you should know
If you’re a new blogger, you should first need to know is some basic information. You need to understand what a domain name is and what web hosting is.
1. Domain Name
A domain name is your website’s online address, which allows people to access your website. If you don’t know anything about domain names, you’ll need to learn about them first.
Here is a detailed guide that will help you to know,
When you purchase hosting from Bluehost, you get a free domain, or if you already have, you can use that. (If you don’t need a free domain name, you can claim it later.)
2. Payment Mode
To purchase web hosting or a domain name from Bluehost, you need a payment method. You can easily pay using a credit card, debit card, or a PayPal account.
If you don’t have any of these payment options available, you can also purchase hosting using your family or friends’ credit or debit cards.
If you are from India, you can also easily make payments through UPI (such as PhonePe, Google Pay, Paytm), net banking, and digital wallets.
Now let me tell you about buying web hosting.
How to Buy Web Hosting with a Free Domain from Bluehost (Beginner Guide)
To purchase web hosting with a free domain from Bluehost, you first need to visit the official Bluehost website and then choose their hosting plan and pricing.
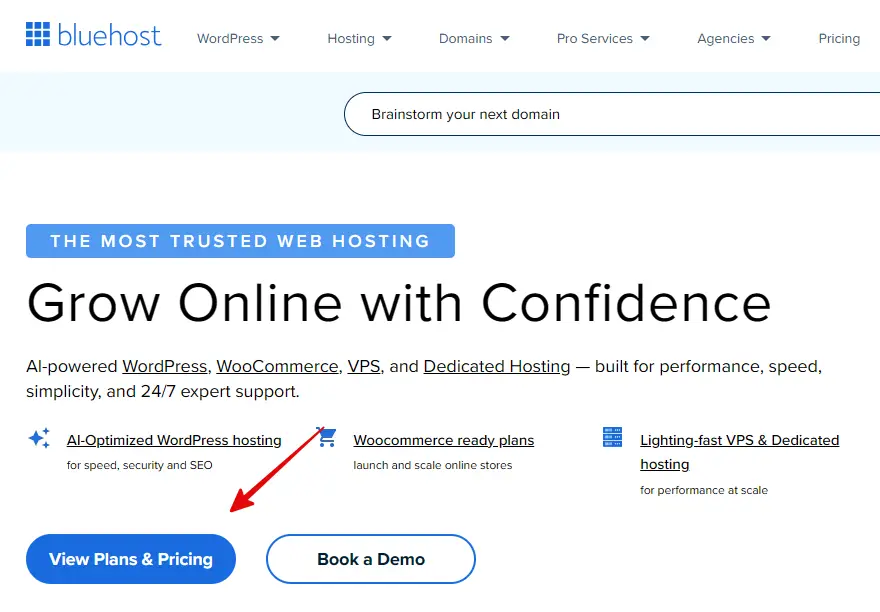
Step 1: Go to Bluehost Website
- First, go to the Bluehost.com website.
- Then, click on the View Plans button.
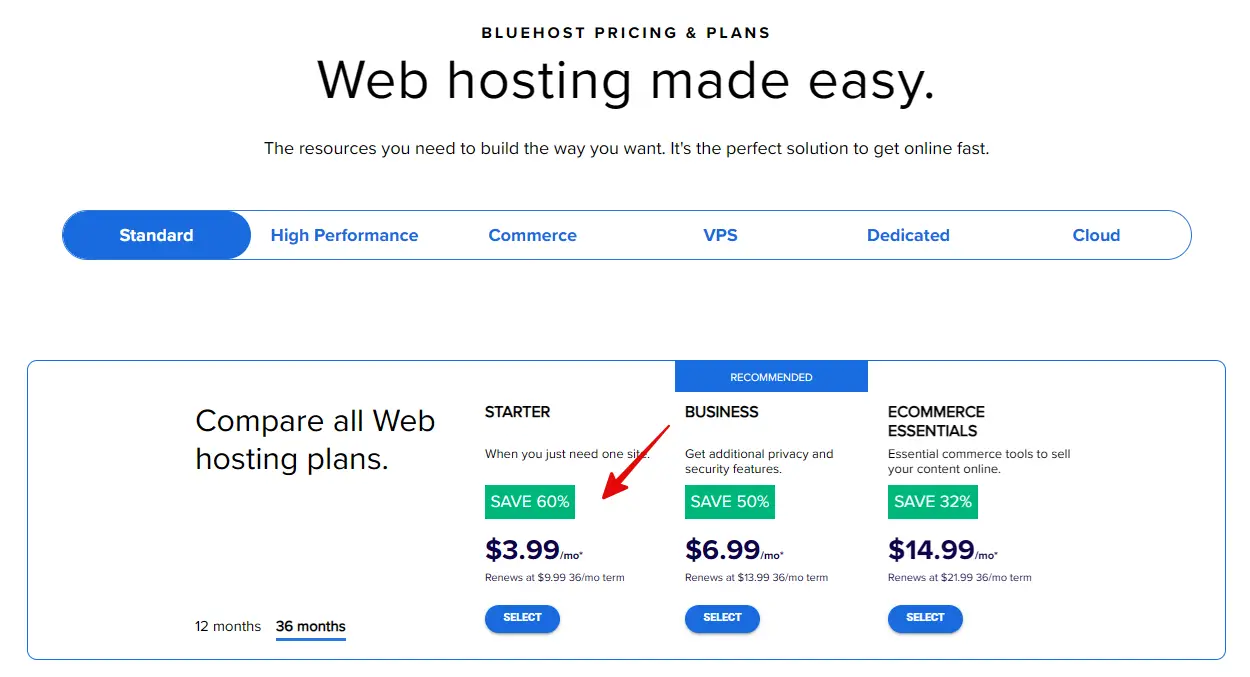
Step 2: Choose a Hosting Plan
Now you will see three different hosting plans from Bluehost. Each plan offers different features, so please read the brief descriptions below:
1. Starter Plan
- A affordable option for beginner bloggers.
- Perfect if you only want to create one website.
2. Business Plan (Recommended)
- With this plan, you can host multiple websites.
- It includes additional privacy and security features.
- Better performance and flexibility.
3. Ecommerce Essentials
- This plan is specifically designed for e-commerce website or online store.
- It includes e-commerce tools and additional features.
If you are planning to run 1–5 blogs or websites, then Business Plan is the best option.
However, you can choose any plan according to your needs and budget.
- After choosing your preferred plan, click on the Select button.
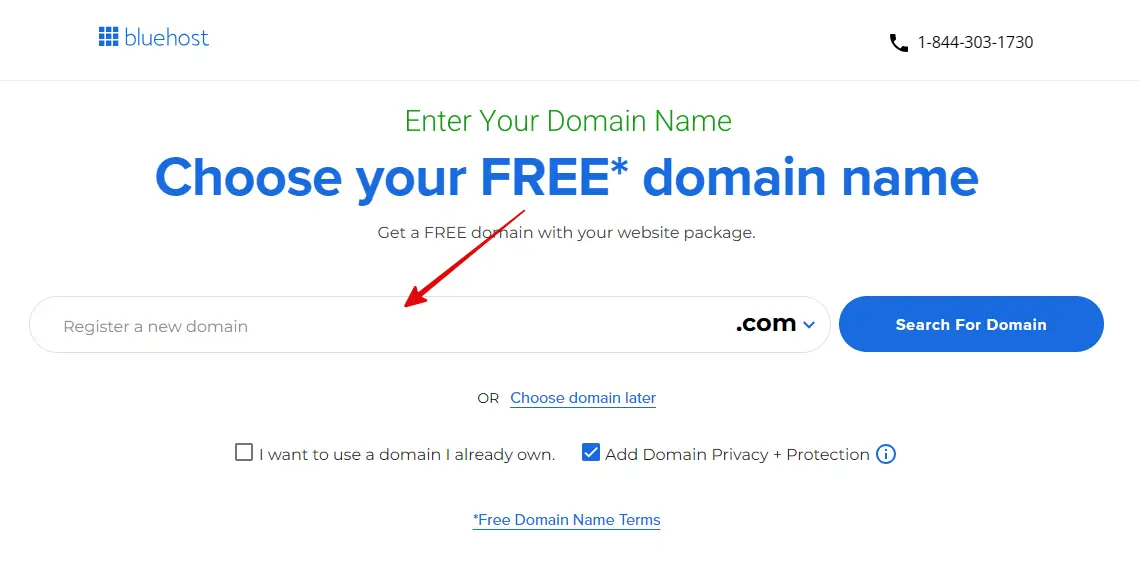
Step 3: Choose Your Free Domain
After choosing a hosting plan, you will see two options: you can either get a free domain name from Bluehost, or use an existing domain name.
But here, we are explaining the process of buying hosting with a free domain in this guide, we will choose the “Free Domain” option here.
- Enter the domain name you want for free.
- and click on the “Search For Domain” button.
If you don’t want to register a new domain name right now, you can use your existing domain name by selecting “I want to use an existing domain“.
You can claim your free domain later, you will need to simply contact Bluehost support team, and they will guide you through the entire process.
If you are using an existing domain name, you will need to go to your domain registration site and change the nameservers in your domain settings.
For example,
- NS1.Bluehost.com
- NS2.Bluehost.com
After changing the name servers, it takes 24-48 hours for the updated DNS records to propagate. This means you will have to wait a little while after changing the name servers.
If you are getting a free domain from Bluehost, you don’t need to perform this step. Let’s move on to the next step.
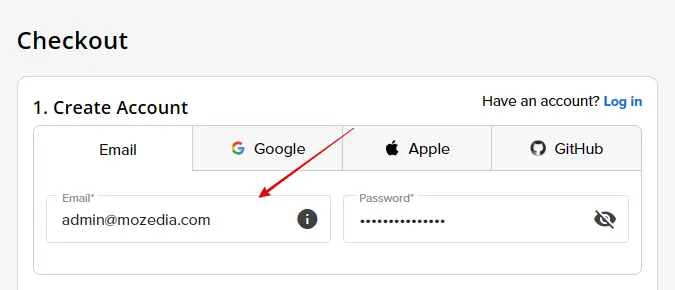
Step 4: Enter Your Account Details
After entering the domain name, the next page will open where you will need to create your Bluehost account using your email ID or log in through Google, Apple, or GitHub.
- Sign u with your name and email address.
- Or log via Google, Apple, or GitHub account.
Step 5: Select Add-ons (Optional)
Bluehost also offers some additional services (add-ons) for security, SEO, and backups. You can choose them according to your requirements.
For exmaple:
- SiteLock Essentials: Website security
- CodeGuard: Automatic site backups
- Yoast: a WordPress SEO plugin
- Google Workspace: Professional email
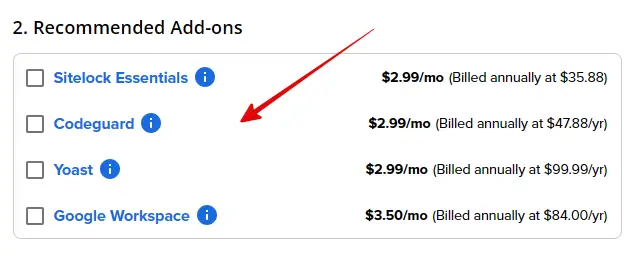
These add-ons are available at a discounted price when you purchase Bluehost hosting, but all of these are optional and not mandatory to buy.
If you are just starting out, you can proceed without any add-ons, and you can add these services later at any time.
Step 6: Fill out the Payment Information
After entering your account details, you will need to choose your payment method, you can pay via your Credit Card, Debit Card, UPI, or PayPal account.
- Fill in the billing information accurately.
- You can also pay via UPI or Paypal account.
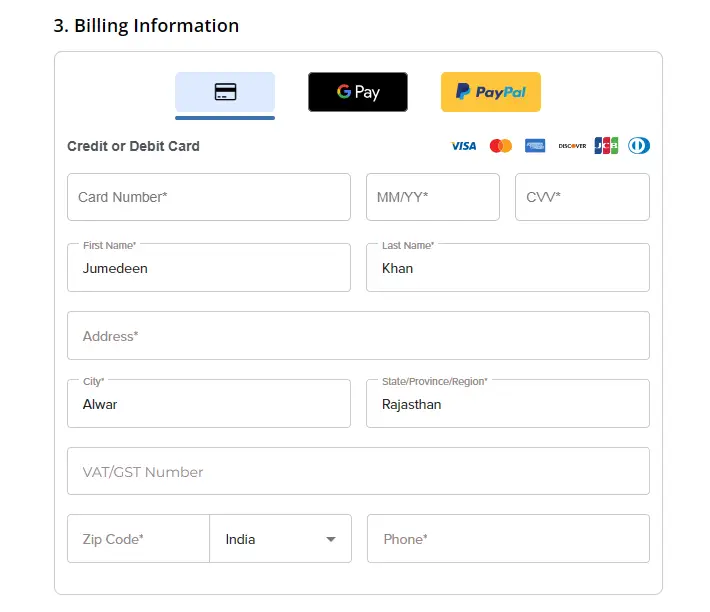
Make sure that you have entered all the information correctly, as your login details, hosting information, and all future important emails will be sent to this address.
Step 7: Review Your Order and Complete Purchase
You’ll now be taken to the Shopping Cart page, where you will see all the details related to your purchase. Here, you need to ensure that you have selected the correct hosting plan.
Also, double-check that your chosen free domain name is correct. If Domain Privacy, Email Trial, or other add-ons are included and you don’t want them, you can remove them.
After that, Review the total price, taxes, and discounts to confirm that everything is correct. If you have a promo code, you can enter it here as well.
Once you are completely satisfied, tick the “Terms and policy”, and click on the Submit Payment button at the bottom.
- Confirm your plan details and the total amount.
- Finally, click on the “Submit Payment” button.

Now you need to complete the payment. You can pay using your preferred method, such as Credit Card, Debit Card, UPI, or PayPal account.
If everything is correct, proceed with the payment, All Done!
Once your payment is complete, your Bluehost account will be activated, and the hosting and domain setup will begin, means it is ready for use.
You will receive an email at your email address, a confirm link and login details will be given in that mail. You can log in by clicking on this confirmation link.
Congratulations, you have successfully purchased web hosting with a free domain from Bluehost.
After this, you will be taken to the Bluehost hosting cPanel/dashboard. The next step is to install WordPress on your hosting account.
We have already told about setting up WordPress on bluehost hosting.
You read this artice to setup your first site:
If you don’t like Bluehost hosting for any reason and want your money back, you can request a refund, as Bluehost also offers a 30-day money-back guarantee.
This means that even if you don’t like their service, you won’t lose any money, so you should definitely give it a try without any hesitation.
Conclusion,
By following this simple guide on “how to buy web hosting with a free domain from Bluehost”, you can set up your hosting in just a few minutes and get your website online.
Bluehost hosts over 2 million websites worldwide and has been providing hosting services since 2003. It is known for providing reliable, fast, and secure hosting for WordPress.
If you want more blogging guide, be sure to read these articles below:
- Top 10 Web Hosting Provider for WordPress Website
- WordPress.com vs WordPress.org: A Detailed Comparison
If you encounter any problems while purchasing hosting or have any questions, you can write your question in the comments section below.
We will do our best to help you.

This guide is incredibly helpful! I’ve been considering Bluehost for my website, and your step-by-step explanation makes the process so much easier. Thanks for sharing such valuable information!
Happy to hear that! Bluehost is a solid option, and I’m sure your website will turn out great. 😊
Thanks and welcome khan
Thanks for sharing this Jumedeen, but I think currently Hostinger hosting is better than Bluehost.
Yes, Hostinger is also best.